I have been asked on numerous occasions whether it is possible to capture rejected records for data loads in Data Management and either send an email with the details or process the rejected records.
EPM cloud changes at a fast pace when it comes to functionality but currently there is no inbuilt ability to handle any of these requirements, also with no Jython scripting like with on-premise FDMEE this rules out a custom solution within Data Management itself. This is not so much of a concern though as most of the automation is handled outside of Data Management with help from EPM Automate or the REST API, so this vastly opens up the possibilities to meet the requirement.
In this two-part blog post, I am going to look at one possible way of capturing rejected records and sending out an email, I will then expand on that to process the rejected records using the metadata functionality available in Data Management.
Before I start I will give my usual disclaimer that this is just one possible solution out of many and it doesn’t mean it is right for everybody, this is not going to be a step by step guide and there is an assumption that you have a good understanding of loading data through Data Management.
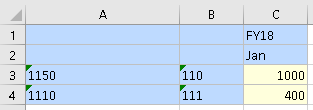
Let us first go through an example of loading data where a few records will be rejected, I am going to concentrate on entity members being rejected and will be using the following simple source file.

The above file contains two entity members “901” and “902” that are not currently part of the entity dimension in the target application.
The import format, location, load rule and mappings have already been created which I don't need to go through as there is nothing different about them.
As the data is all numeric, the load method in the data load rule has been set as “Numeric Data Only”, this means data is directly loaded to Essbase using a load rule.

The full data load process is run from the workbench and the export fails but at this stage it is not clear why.

Even if you look at the process details, it only provides details to inform the export data to target application step has failed.


It is not until you open the process log and analyse it that you realise the reason behind the failure.

The process log highlights there were data load errors and includes the records where the error occurred, the error “3303” means that there were rejections, the entry also includes the member which was rejected, so you can see that the entity members “901” and “902” were rejected.
On a side note if the data load method was one of the all data types then the error in the log will be different and looks something like:

The process failing in Data Management is a bit deceiving as the data load did not fail, the data load completes but a few of the records were rejected.
Performing a simple retrieve shows data was loaded to the target application for the valid rows.
It would be nice if there was an option in Data Management to change the failure to a warning and provide a more informative process step message, even better if there was enhanced logging around the errors or a separate download file containing the load errors, maybe this will happen at some point in the future but this is where we are at the moment.
You may be asking, why not use data load mappings to assign any unmapped members to a defined member like:

This is perfectly acceptable but the issue is if you have multiple unassigned members in the data then you would need to first understand if any data has been loaded to the unassigned bucket, find out which members, create the members in the target application, clear the data, update data load mappings and finally reload the data.
The idea of this post is to stick with members being rejected and then be informed if there are errors with the use of automation.
We know that if a load process fails the log contains the errors so it is just coming up with a way to process and automate this.
With EPM Automate it is possible to find out the load process has failed, if we take an example with the same data set using the “rundatarule” command to execute the rule:

In the example above the “LD_Actuals” data load rule is executed just for the export step for the period “Jan-18”, EPM Automate returns that the command failed to execute which is not the most informative message, in reality the command did execute and the process completed with a failure, same as earlier the data has been loaded but there were rejections.
Instead of capturing the returned text from EPM Automate, the exit code could have been accessed which in this case would be 1, either way it doesn’t tell us much.
It is certainly possible to end the process here and send out an email:

I wouldn’t be happy with ending at this point so let us keep going, besides not being presented with the most informative failure message there is no indication to the Data Management process ID, if we know the process ID we could download the process log and then parse to find out more details on the failure, ok there are ways to list out files and then check for the latest log but there is room for error, for example if multiple processes complete around the same time.
EPM Automate is built on top of the REST API so let us take a look at the type of information that is returned if the same process is replicated.
I have covered the REST API in the past so I don’t want to go into too much detail but using a REST client I can simply demonstrate running a rule by passing in parameters in the body of the request.

The response includes some valuable information such as the log details, process ID and the status of the process.

The response indicates that the process is currently running so it can be repeatedly checked using a REST request until it completes.

The response now indicates the process has failed and the advantage over EPM Automate is that we know the name of the process log which could be downloaded.
This process can be automated using scripting and I am going to provide an example of how to do this using PowerShell but it is up to you which scripting language you use, please be aware I try to keep it as simple as possible to display on the blog so it doesn’t handle every possible outcome, I leave that for the final scripts I use.
I will break it down into bite-sized sections and to start with the variables are defined, this include the Data Management data load rule name, period name, import and export modes, the local path for files and logs and the URLs for the REST API resources.

Now on to the real work, the username and password are encoded which will be added to the header of the REST request.
The body of the REST request is built using the defined variables and then converted into JSON format.
Next a request to the Data Management REST resource is made which executes the data load rule based on the body of the request.

Once a response is returned the status can repeatedly checked until the Data Management process completes, I am not going to include this section as I have done it many times in the past and if you want a simple example then have a look here.
At this point if I check the status of the process, it will have failed.

So now that we know the job failed and the log file name, the log can download using one of the application management REST resources.
Once again I have already covered downloading files using the REST API which you can read all about here.

At this stage, the log for the process that failed has been downloaded.

The automated process could end here by sending an email and attaching the log, this could be achieved with something similar to:

The email could contain information such as the data load rule name, the process ID and the log of the failed process.

Taking it a step further, before sending the email the process log could be parsed for data load errors.

In the above example each line of the process log is read and checked for “Error: 3303” and for demo purposes they are outputted to the console.
Instead of outputting the errors to the console these can either be stored in a variable or written to a file.

In my example I have stored the errors and then included them in the body of the email but they could have easily been written to a file and sent as an attachment.

Now the email recipient will know that the data load process has failed with load errors and they will also have visibility of the records that were rejected.
This is all good but it can be taken a step further, the members that were rejected could be loaded into the target application using the Data Management metadata functionality, the data could then be reloaded to the correct members without any rejections.
Look out for the next part where I will go through the process.
EPM cloud changes at a fast pace when it comes to functionality but currently there is no inbuilt ability to handle any of these requirements, also with no Jython scripting like with on-premise FDMEE this rules out a custom solution within Data Management itself. This is not so much of a concern though as most of the automation is handled outside of Data Management with help from EPM Automate or the REST API, so this vastly opens up the possibilities to meet the requirement.
In this two-part blog post, I am going to look at one possible way of capturing rejected records and sending out an email, I will then expand on that to process the rejected records using the metadata functionality available in Data Management.
Before I start I will give my usual disclaimer that this is just one possible solution out of many and it doesn’t mean it is right for everybody, this is not going to be a step by step guide and there is an assumption that you have a good understanding of loading data through Data Management.
Let us first go through an example of loading data where a few records will be rejected, I am going to concentrate on entity members being rejected and will be using the following simple source file.
The above file contains two entity members “901” and “902” that are not currently part of the entity dimension in the target application.
The import format, location, load rule and mappings have already been created which I don't need to go through as there is nothing different about them.
As the data is all numeric, the load method in the data load rule has been set as “Numeric Data Only”, this means data is directly loaded to Essbase using a load rule.
The full data load process is run from the workbench and the export fails but at this stage it is not clear why.
Even if you look at the process details, it only provides details to inform the export data to target application step has failed.
It is not until you open the process log and analyse it that you realise the reason behind the failure.
The process log highlights there were data load errors and includes the records where the error occurred, the error “3303” means that there were rejections, the entry also includes the member which was rejected, so you can see that the entity members “901” and “902” were rejected.
On a side note if the data load method was one of the all data types then the error in the log will be different and looks something like:
The process failing in Data Management is a bit deceiving as the data load did not fail, the data load completes but a few of the records were rejected.
Performing a simple retrieve shows data was loaded to the target application for the valid rows.
It would be nice if there was an option in Data Management to change the failure to a warning and provide a more informative process step message, even better if there was enhanced logging around the errors or a separate download file containing the load errors, maybe this will happen at some point in the future but this is where we are at the moment.
You may be asking, why not use data load mappings to assign any unmapped members to a defined member like:
This is perfectly acceptable but the issue is if you have multiple unassigned members in the data then you would need to first understand if any data has been loaded to the unassigned bucket, find out which members, create the members in the target application, clear the data, update data load mappings and finally reload the data.
The idea of this post is to stick with members being rejected and then be informed if there are errors with the use of automation.
We know that if a load process fails the log contains the errors so it is just coming up with a way to process and automate this.
With EPM Automate it is possible to find out the load process has failed, if we take an example with the same data set using the “rundatarule” command to execute the rule:
In the example above the “LD_Actuals” data load rule is executed just for the export step for the period “Jan-18”, EPM Automate returns that the command failed to execute which is not the most informative message, in reality the command did execute and the process completed with a failure, same as earlier the data has been loaded but there were rejections.
Instead of capturing the returned text from EPM Automate, the exit code could have been accessed which in this case would be 1, either way it doesn’t tell us much.
It is certainly possible to end the process here and send out an email:
I wouldn’t be happy with ending at this point so let us keep going, besides not being presented with the most informative failure message there is no indication to the Data Management process ID, if we know the process ID we could download the process log and then parse to find out more details on the failure, ok there are ways to list out files and then check for the latest log but there is room for error, for example if multiple processes complete around the same time.
EPM Automate is built on top of the REST API so let us take a look at the type of information that is returned if the same process is replicated.
I have covered the REST API in the past so I don’t want to go into too much detail but using a REST client I can simply demonstrate running a rule by passing in parameters in the body of the request.
The response includes some valuable information such as the log details, process ID and the status of the process.
The response indicates that the process is currently running so it can be repeatedly checked using a REST request until it completes.
The response now indicates the process has failed and the advantage over EPM Automate is that we know the name of the process log which could be downloaded.
This process can be automated using scripting and I am going to provide an example of how to do this using PowerShell but it is up to you which scripting language you use, please be aware I try to keep it as simple as possible to display on the blog so it doesn’t handle every possible outcome, I leave that for the final scripts I use.
I will break it down into bite-sized sections and to start with the variables are defined, this include the Data Management data load rule name, period name, import and export modes, the local path for files and logs and the URLs for the REST API resources.
Now on to the real work, the username and password are encoded which will be added to the header of the REST request.
The body of the REST request is built using the defined variables and then converted into JSON format.
Next a request to the Data Management REST resource is made which executes the data load rule based on the body of the request.
Once a response is returned the status can repeatedly checked until the Data Management process completes, I am not going to include this section as I have done it many times in the past and if you want a simple example then have a look here.
At this point if I check the status of the process, it will have failed.
So now that we know the job failed and the log file name, the log can download using one of the application management REST resources.
Once again I have already covered downloading files using the REST API which you can read all about here.

At this stage, the log for the process that failed has been downloaded.
The automated process could end here by sending an email and attaching the log, this could be achieved with something similar to:
The email could contain information such as the data load rule name, the process ID and the log of the failed process.
Taking it a step further, before sending the email the process log could be parsed for data load errors.
In the above example each line of the process log is read and checked for “Error: 3303” and for demo purposes they are outputted to the console.
Instead of outputting the errors to the console these can either be stored in a variable or written to a file.

In my example I have stored the errors and then included them in the body of the email but they could have easily been written to a file and sent as an attachment.
Now the email recipient will know that the data load process has failed with load errors and they will also have visibility of the records that were rejected.
This is all good but it can be taken a step further, the members that were rejected could be loaded into the target application using the Data Management metadata functionality, the data could then be reloaded to the correct members without any rejections.
Look out for the next part where I will go through the process.

G'day John,
ReplyDeleteLooks good - very interested to see what you come up with to create the metadata through data management - I used the dynamic member creation and the REST API.
Interestingly, one of my guys (@HyperionJedi) came up with a method of pulling the order of the dimensions from the import formal.xml file (from the data management XML LCM files).
<# Powershell to pull dimensionality from the Import Format #>
[xml]$XMLFile = Get-Content 'C:\Oracle\Create_Member\Import Format.xml'
$LoadRule = 'Student_EFTSL' #Pass Load_Rule name
$XPathFilter = “.//*[Impgroupkey = '$LoadRule']” #Set XPath filter for load rule
$Dimensions = @{} #Create a Hash Table
$LoadRuleNode = $XMLFile.SelectNodes($XPathFilter) #Set XPath
foreach ($ItemDetail in $LoadRuleNode.ImportItemDetailsForFileLcmVO.ImportItemDetailsForFileLcmVORow) #iterate through the details for the dimensionality
{
$Dimensions.add($ItemDetail.Impfldfieldname,$ItemDetail.Impfldsourcecolname) #Add to the hashtable the dimensional information
}
Thanks Pete, I will be keeping it simple for the metadata, I don't want to overload readers with code and I just want to provide a starting point.
ReplyDeleteHi John,
ReplyDeletefirst of all, thanks for sharing your knowledge with all of us. I was reading this blog, as well as the REST 1 and 2 ones referenced in it, but I can't see where do you set password that you use in the Autorization lines? When using EPM Automate we can use encrypted file, but how do we do the same when creating headers for REST calls. I am total newbie when it comes to REST, so please provide detailed information if you have time. Thanks, Milos
If you want to encrypt/decrypt a password then you will need to have a search on the internet for different techniques, it is only base64 encrypted when it is added to the header.
ReplyDelete